Correcting or Stitching Orthomosaics Manually
Important
You will generally get better results if you ensure you have all raw imagery in advance and pass it into OpenDroneMap.
This allows for sophisticated stiching of the images together using point cloud meshes etc and is more accurate.
However, in some circumstances this is not possible:
- You are running ODM on a machine with limited resources.
- The orthomosaics were generated already, but now you need to stitch them together and do not have the source imagery.
This process may also be useful to re-align imagery that is badly georeferenced in the output from ODM.
The preferred approach would be including ground control points in your flights (although this can be expensive).
Failing that you may use this process to align the resulting imagery with another georeferenced layer, such as Bing/Esri/OSM.
This workflow uses QGIS to georeference each orthomosaic manually, then merges the corrected TIFFs into a single output.
Credit to Sam Colchester who took the time to work this out and document for the benefit of other users!
Requirements
- QGIS.
- QuickMapServices plugin in QGIS.
- QuickMapServices contributed servuces enabled so Bing and Esri basemaps are available.
- otbcli_Mosaic installed from Orfeo Toolbox for the merge step.
gdalwarpfor optional reprojection and compression.
1. Configure QGIS basemaps
Install the QuickMapServices plugin in QGIS.
Then enable the contributed services so you can load Bing and Esri reference imagery:
- Open
Web > QuickMapServices > Settings. - Go to the
More servicestab. - Click
Get contributed pack.
After that, add a reference layer such as Bing, Esri, or OSM to help place control points accurately.
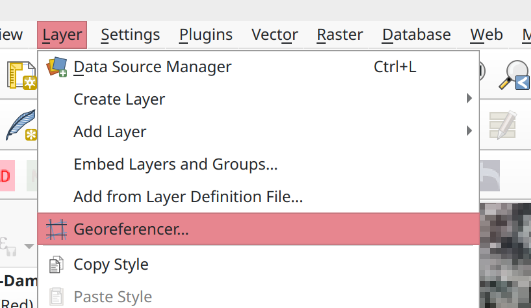
2. Open the Georeferencer
In QGIS, open Layer > Georeferencer.
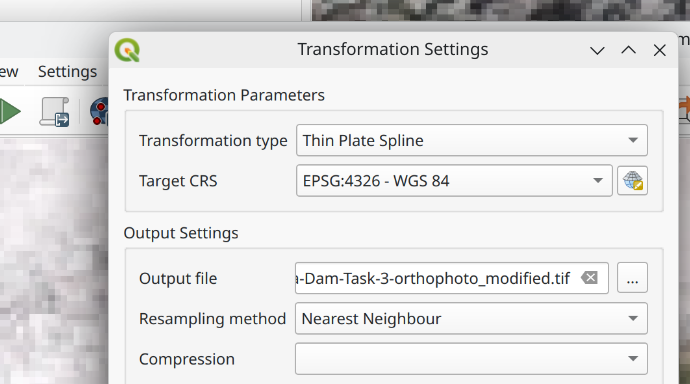
3. Set the transformation type
In Georeferencer, open Settings > Transformation settings and set
the transformation type to Thin Plate Spline.
This method is useful when the orthomosaic needs local warping rather than a simple shift or rotation.
4. Georeference the first TIFF
- Choose
Open Rasterand load one of the orthomosaic TIFF files. - Start adding control points against Bing, Esri, or OSM.
- Use at least 10 control points.
- Prefer 30 or more when the image covers a large area or shows uneven distortion.
Spread the points across the full image rather than clustering them in one corner.
5. Georeference the remaining TIFFs
Once the first TIFF is aligned, georeference the remaining TIFFs:
- Align them against the already-corrected TIFF anywhere the images overlap.
- Continue using Bing, Esri, or OSM in areas where there is no overlap between TIFFs.
This usually gives better continuity across the final mosaic than matching every TIFF independently against the basemap.
6. Merge the corrected TIFFs
Save all resulting TIFFs into a single folder, then open a terminal in that folder and run:
tifs_list=$(ls *.tif | tr '\n' ' ')
otbcli_Mosaic -il $tifs_list -out temp_mosaic.tif uint16 -comp.feather large
7. Optional: reproject to WGS84 and compress
If you want the final output in WGS84 (EPSG:4326) with LZW
compression, run:
gdalwarp -t_srs EPSG:4326 -r cubicspline -co COMPRESS=LZW -co TILED=YES temp_mosaic.tif final_4326.tif
Result
At the end of the process you should have:
- Individually corrected orthomosaic TIFFs
- One merged mosaic
- Optionally, a compressed WGS84 output TIFF
Notes
- Bing, Esri, and OSM are useful reference layers, but they may still contain small positional offsets depending on location.
- The manual georeferencing quality depends heavily on point placement. Use stable visible features such as road intersections, building corners, bridges, or other clear landmarks.
- If you still have the original drone imagery, OpenDroneMap remains the preferred option for producing the best overall mosaic.
- Also, note that using 'Thin Plate Spline' in QGIS may result in visual distortion of your imagery, despite it being correctly georeferenced.